The Sunday night blues is a real thing! It can sometimes rob you of half of your weekend. You wake up Sunday morning and you realize you have to plan for Monday (tomorrow) and it bums out you! The amount of time you spend thinking, dreading and doing it really saps your energy too.
Why not try making the "start" of your week on a Wednesday?
You wake up Sunday morning and you realize, "hey, I've already done my plans! I can relax, enjoy doing things that I want to do and not have to worry/dread/stress about planning for this week."
As a Music teacher or special area teacher, you probably plan for the span of time between when you see the same class. Your classes could meet once a week, once every 6 days or something different. You probably plan one lesson for each grade level and you don't need a new lesson until you've taught all of your classes. Generally we consider Monday as the start of the week. But it doesn't have to be. Why not pick another day? You'll still see the same classes, just teach them in a different order.
For example, Wednesday is now your "new Monday". You think about your upcoming lessons on Monday during your planning period or after school and write down your plans. Then on Tuesday, you fine tune the plans, create any powerpoints, Smart board notebook files and/or playlists and double check that you have all the materials you'll need. On Wednesday you begin the new lessons and teach them until next Tuesday. And voila! No more Sunday night blues!
Give it a try and let me know how this worked out for you!
Happy Honking! Ellen
Making the Most of a Few Instruments
Using hand instruments in the music room seems like an obvious activity...unless you don't have many instruments.
How do you give your students the opportunity to play when you only have a few instruments?
First, choose an ACTIVITY that can be performed with both BODY PERCUSSION (clap, snap, pat, etc.) and hand INSTRUMENTS. You can adapt an Orff piece from some of the myriad of resources available or from your text series. Change it up: substitute body percussion for each of the parts and these will later evolve into instrument parts.
Disclaimer: Make sure you REALLY like the piece because you are going to hear it ALOT!!
EX. You have 5 triangles, 5 hand drums and 5 sets of rhythm sticks.

A) You teach everyone the 1st part with body percussion. Have them perform it successfully without you. Then have them perform the 1st part while you play the 2nd part. Teach them the 2nd part.
B) Divide the class into 2 groups. Have each group perform 1 of the patterns at the same time. Switch the parts giving students an opportunity to perform both parts. Then have them perform their parts while you perform the 3rd part. Teach them the 3rd part.
C) Divide your class into 3 groups. One group for each part - all using body percussion. Give every group an opportunity to play each part while the other parts are playing along too.
D) Now you add the INSTRUMENTS! YIPPEE! Demonstrate the proper way to hold and play each instrument.
E) Five kids out of group 1 play their rhythm on the triangles while the rest of Group 1 supports them with body percussion. Five kids out of group 2 play their rhythm on the hand drums while the rest of Group 2 supports them with body percussion. And the same for group 3 and the rhythm sticks.
F) Perform the piece several times. Then WITHIN EACH GROUP those who were playing the instrument will SWITCH back to body percussion and those who haven't played an instrument take their turns. Again perform the piece several times.
G) Now the groups will ROTATE to the next instrument. Group 1 kids will now play the hand drum part. Group 2 will now play the rhythm stick part. And Group 3 will now play the triangle part. Again, only about 1/2 of the students will be playing the instruments, the rest of the group will still be doing body percussion. Then SWITCH with the group.
H) REPEAT this one more time so that each group of students will have played all 3 of the instruments.
Use the space of the room you are teaching in and separate the groups physically. When you are ready to have the students move to the next space (group), have a SIGNAL. For example, before giving directions about where each group goes begin with "when I clap, group 1 goes to where group 2 is, group 2 goes...etc." The clap is the signal that they should be waiting for. If your students move before your signal, stop the class, have them go back to where they started and wait for the signal again. FYI having kids transition with NO SIGNAL = CHAOS!
I hope this was helpful. I'd love to hear how this worked for you so please leave a comment below.
Happy Honking! Ellen
I just posted one of my BEST resources on TeachersPayTeachers. Music Terms & Vocabulary posters. - almost 100 posters! Just print and hang!
You can get it for free! Send me an email at harmonyinthehood.com and I will tell you how.
One reviewer wrote "This wonderful file will be great for all ages. The specific graphics will be helpful for students also! Thank you!!"
Another reviewer wrote "This will be a great starting point for me as I put together a unit on musical decades!"
Don't miss this great opportunity to get this awesome resource for FREE!
How do you give your students the opportunity to play when you only have a few instruments?
First, choose an ACTIVITY that can be performed with both BODY PERCUSSION (clap, snap, pat, etc.) and hand INSTRUMENTS. You can adapt an Orff piece from some of the myriad of resources available or from your text series. Change it up: substitute body percussion for each of the parts and these will later evolve into instrument parts.
Disclaimer: Make sure you REALLY like the piece because you are going to hear it ALOT!!
EX. You have 5 triangles, 5 hand drums and 5 sets of rhythm sticks.

A) You teach everyone the 1st part with body percussion. Have them perform it successfully without you. Then have them perform the 1st part while you play the 2nd part. Teach them the 2nd part.
B) Divide the class into 2 groups. Have each group perform 1 of the patterns at the same time. Switch the parts giving students an opportunity to perform both parts. Then have them perform their parts while you perform the 3rd part. Teach them the 3rd part.
C) Divide your class into 3 groups. One group for each part - all using body percussion. Give every group an opportunity to play each part while the other parts are playing along too.
D) Now you add the INSTRUMENTS! YIPPEE! Demonstrate the proper way to hold and play each instrument.
E) Five kids out of group 1 play their rhythm on the triangles while the rest of Group 1 supports them with body percussion. Five kids out of group 2 play their rhythm on the hand drums while the rest of Group 2 supports them with body percussion. And the same for group 3 and the rhythm sticks.
F) Perform the piece several times. Then WITHIN EACH GROUP those who were playing the instrument will SWITCH back to body percussion and those who haven't played an instrument take their turns. Again perform the piece several times.
G) Now the groups will ROTATE to the next instrument. Group 1 kids will now play the hand drum part. Group 2 will now play the rhythm stick part. And Group 3 will now play the triangle part. Again, only about 1/2 of the students will be playing the instruments, the rest of the group will still be doing body percussion. Then SWITCH with the group.
H) REPEAT this one more time so that each group of students will have played all 3 of the instruments.
Use the space of the room you are teaching in and separate the groups physically. When you are ready to have the students move to the next space (group), have a SIGNAL. For example, before giving directions about where each group goes begin with "when I clap, group 1 goes to where group 2 is, group 2 goes...etc." The clap is the signal that they should be waiting for. If your students move before your signal, stop the class, have them go back to where they started and wait for the signal again. FYI having kids transition with NO SIGNAL = CHAOS!
I hope this was helpful. I'd love to hear how this worked for you so please leave a comment below.
Happy Honking! Ellen
I just posted one of my BEST resources on TeachersPayTeachers. Music Terms & Vocabulary posters. - almost 100 posters! Just print and hang!
You can get it for free! Send me an email at harmonyinthehood.com and I will tell you how.
One reviewer wrote "This wonderful file will be great for all ages. The specific graphics will be helpful for students also! Thank you!!"
Another reviewer wrote "This will be a great starting point for me as I put together a unit on musical decades!"
Don't miss this great opportunity to get this awesome resource for FREE!
Labels:
classroom management,
instruments,
organization
4 Reasons to Dance
Kids need to move - we all know that. And yes, GoNoodle is a wonderful brain break for the kids in the classroom. But using dance in the Music room is different.
Phyllis Weikart is the accepted authority on using pattern dances in the music class. Her Rhythmically Moving series is the ultimate source for step by step instructions for folk dances from ALL over the world.
But when your principal walks by your room and questions why your students are movin' and groovin', here are 4 valid reasons to give to him or her.
1. It's truly engaging. The idea is simple. All of us retain whatever we are learning if we are truly interested. Because dancing is so enjoyable, your students will be focused and joining in the fun. Even reluctant students will see their classmates have a blast and they won't be able to stop themselves from giving it a try.
2. Kids are actively listening, not passively sitting. Now knowing how to listen to music in a concert is definitely a desired skill to have your students master. This kind of listening is different. Students must listen to the music in order to move at the correct time. They listen for melodies, repeated sections and changes in phrases and tempo. And they can demonstrate with their bodies that they are understanding what they are hearing.
3. Dancing is social. Brain research tells us that we are social creatures and we retain material better when we are participating and sharing it with others. It requires using appropriate behavior. It encourages cooperation and support among all peer groups. When students make mistakes, their classmates are ready to help them get back on track in order to keep the dance going. Students frequently laugh at their own mistakes so the stress level of trying something is reduced, even eliminated.
4. Dancing exposes kids to music from all over the world.
The Music Education National Standards mention becoming familiar with folk music from all cultures. As we know, music, particularly from our own personal background, evokes emotion. Connecting students to music of different heritages brings an understanding on this more emotional level as well as an intellectual one.
Introducing dance into your music curriculum is sound pedagogy It's also really enjoyable!
As always, I'd love to know if you've used dance in your music classes. Please leave a comment below.
Happy Honking! Ellen
Phyllis Weikart is the accepted authority on using pattern dances in the music class. Her Rhythmically Moving series is the ultimate source for step by step instructions for folk dances from ALL over the world.
1. It's truly engaging. The idea is simple. All of us retain whatever we are learning if we are truly interested. Because dancing is so enjoyable, your students will be focused and joining in the fun. Even reluctant students will see their classmates have a blast and they won't be able to stop themselves from giving it a try.
2. Kids are actively listening, not passively sitting. Now knowing how to listen to music in a concert is definitely a desired skill to have your students master. This kind of listening is different. Students must listen to the music in order to move at the correct time. They listen for melodies, repeated sections and changes in phrases and tempo. And they can demonstrate with their bodies that they are understanding what they are hearing.
3. Dancing is social. Brain research tells us that we are social creatures and we retain material better when we are participating and sharing it with others. It requires using appropriate behavior. It encourages cooperation and support among all peer groups. When students make mistakes, their classmates are ready to help them get back on track in order to keep the dance going. Students frequently laugh at their own mistakes so the stress level of trying something is reduced, even eliminated.
4. Dancing exposes kids to music from all over the world.
The Music Education National Standards mention becoming familiar with folk music from all cultures. As we know, music, particularly from our own personal background, evokes emotion. Connecting students to music of different heritages brings an understanding on this more emotional level as well as an intellectual one.
Introducing dance into your music curriculum is sound pedagogy It's also really enjoyable!
As always, I'd love to know if you've used dance in your music classes. Please leave a comment below.
Happy Honking! Ellen
Smart Organization: the Smart board
Smart boards are a GREAT tool in the Music room! If you are one of the lucky ones to have a Smart board in your room or in the rooms where you teach, it can make your lessons flow and keep you on track.
If you have no Smart board BUT you do have a projector and screen you can use this same strategy using Powerpoint or Google Slides.
This saves you from hauling a dozen posters with you to every room you teach in. It's in the cloud or on your flash drive. Let's take a look at this amazing tool slide by slide.
1. The board is displaying a message for your students to read as soon as they enter your room, ie. What can you tell me about Mozart? Or can you name a percussion instrument and explain how to play it?
After briefly discussing the responses, you continue with the next slide.
2. In this slide there are pictures that link to various song lyrics in Powerpoint or other Smart Notebook files. Each picture represents a song for a grade level so if you teach 5 grade levels then you have 5 pictures.
3. Rhythmic reading can be slide 3 (and 4, 5, etc. depending on how many grades you have.) One slide for each grade level. Rhythmic passages that scaffold from one grade to another help to keep you on track when teaching multiple grades. Students read the rhythms with syllables, clap them, and even add hand percussion.
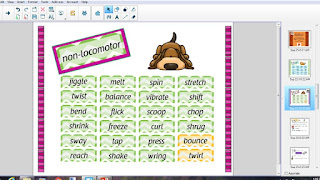
4. Following the rhythm slides are the slides that display the main activity of each of your lessons. These are the slides where you have different types of locomotor and non-locomotor movements for 2nd grade. Or on the next slide you might visually break down the 3 body percussion parts of the 5th grade piece.
5. Nearing the end of your music lesson, you might calm everyone with a listening activity. Slides that introduce or review a certain style of music or specific composer.
Or again make it interactive
Now you have reached the end of your lesson. Your students exit your room and you start the presentation all over with the next class. If you have different grade level classes every period, this can really save your brain!
It's all contained in one place.
It goes in the order YOU want the lesson to go.
It is highly visual in a class that is basically auditory.
It gives your students something to look at while learning and listening.
Does creating this presentation take time every week or every 6 days or however your schedule falls? Yes it does- the 1st year! Is it worth it? ABSOLUTELY! Just like writing plans or creating lessons takes time, it is an investment in your future as a teacher. The beauty of these presentations is that once you've made them, you can use them next year and over and over. It bears repeating - it is totally worth your time.
If you do something different that works for you, I would LOVE to see it the comments below!
Happy Honking! Ellen
If you have no Smart board BUT you do have a projector and screen you can use this same strategy using Powerpoint or Google Slides.
This saves you from hauling a dozen posters with you to every room you teach in. It's in the cloud or on your flash drive. Let's take a look at this amazing tool slide by slide.
1. The board is displaying a message for your students to read as soon as they enter your room, ie. What can you tell me about Mozart? Or can you name a percussion instrument and explain how to play it?
| I love "would you rather"s. Rachel Lynette has a bunch of free ones. |
2. In this slide there are pictures that link to various song lyrics in Powerpoint or other Smart Notebook files. Each picture represents a song for a grade level so if you teach 5 grade levels then you have 5 pictures.
| I totally LOVE Music K-8 magazine! They have created the powerpoints for you! |
3. Rhythmic reading can be slide 3 (and 4, 5, etc. depending on how many grades you have.) One slide for each grade level. Rhythmic passages that scaffold from one grade to another help to keep you on track when teaching multiple grades. Students read the rhythms with syllables, clap them, and even add hand percussion.
4. Following the rhythm slides are the slides that display the main activity of each of your lessons. These are the slides where you have different types of locomotor and non-locomotor movements for 2nd grade. Or on the next slide you might visually break down the 3 body percussion parts of the 5th grade piece.
| Make it interactive. Have the kids come to the board and circle their choice. Thanks to David Row at Making Moments Matter. |
5. Nearing the end of your music lesson, you might calm everyone with a listening activity. Slides that introduce or review a certain style of music or specific composer.
Or again make it interactive
Now you have reached the end of your lesson. Your students exit your room and you start the presentation all over with the next class. If you have different grade level classes every period, this can really save your brain!
It's all contained in one place.
It goes in the order YOU want the lesson to go.
It is highly visual in a class that is basically auditory.
It gives your students something to look at while learning and listening.
Does creating this presentation take time every week or every 6 days or however your schedule falls? Yes it does- the 1st year! Is it worth it? ABSOLUTELY! Just like writing plans or creating lessons takes time, it is an investment in your future as a teacher. The beauty of these presentations is that once you've made them, you can use them next year and over and over. It bears repeating - it is totally worth your time.
If you do something different that works for you, I would LOVE to see it the comments below!
Happy Honking! Ellen
Labels:
classroom management,
listening,
organization,
planning
2 ways to create calm transitions in your classroom
When I first started teaching I was so concerned about music content and materials that I didn't really consider transitions or even protocols for activities. The kids behaved so calmly in the halls with their classroom teachers but once they came into my room, they forgot all about that.

I told myself that was OK because I teach music, right?
And music is a noisy subject, right?
But honestly it felt chaotic to me and it kinda wore me out. I didn't realize that having structure, procedures and protocols for behavior in my classroom didn't make me a control freak. It made me a good teacher.
I needed to take charge. After all this was MY room and I wanted to be comfortable in it. When I'd ask the kids to be "good", that wasn't specific enough. So I decided that my music room needed some FORMAL routines for pretty much EVERYTHING.
I created a step-by-step protocol for entering the room and exiting the room.
Posters of the entrance and exit routines were hung in the front of the room for visual cues.

And then we PRACTICED them a few times in each class and not just at the time of the transitions. I made sure that transition looked and sounded like I wanted it to. And if the behavior slipped once in a while, we would review the expectations and do the transition again and get it right.
I also chose CALM activities that came right after entering and right before leaving in order to make the transitions smoother. For example, you will notice we do "brain hook-up" right after sitting down.
Later on I even added a poster listing the order of the activities in the music class so students could anticipate transitions.
Having the students know the expectations gave them a point of reference. They knew how they were supposed to enter, exit, hand out materials, collect materials, etc. And when they were ready, I assigned leadership roles to students to give them more influence in creating our classroom atmosphere. See my earlier blog on JOBS.
By giving students guidelines to follow, they knew what I wanted them to do and that made a world of difference for me.
Happy Honking! Ellen

I told myself that was OK because I teach music, right?
And music is a noisy subject, right?
But honestly it felt chaotic to me and it kinda wore me out. I didn't realize that having structure, procedures and protocols for behavior in my classroom didn't make me a control freak. It made me a good teacher.
I needed to take charge. After all this was MY room and I wanted to be comfortable in it. When I'd ask the kids to be "good", that wasn't specific enough. So I decided that my music room needed some FORMAL routines for pretty much EVERYTHING.
I created a step-by-step protocol for entering the room and exiting the room.
Posters of the entrance and exit routines were hung in the front of the room for visual cues.

And then we PRACTICED them a few times in each class and not just at the time of the transitions. I made sure that transition looked and sounded like I wanted it to. And if the behavior slipped once in a while, we would review the expectations and do the transition again and get it right.
![]() |
| LINING UP |
I also chose CALM activities that came right after entering and right before leaving in order to make the transitions smoother. For example, you will notice we do "brain hook-up" right after sitting down.
Later on I even added a poster listing the order of the activities in the music class so students could anticipate transitions.
Having the students know the expectations gave them a point of reference. They knew how they were supposed to enter, exit, hand out materials, collect materials, etc. And when they were ready, I assigned leadership roles to students to give them more influence in creating our classroom atmosphere. See my earlier blog on JOBS.
By giving students guidelines to follow, they knew what I wanted them to do and that made a world of difference for me.
Happy Honking! Ellen
Labels:
classroom management,
organization,
planning
4 Time Saving Hacks for Lesson Planning
I am one of those teachers who has to have a lesson plan. Yes I've had to "wing it" from time to time but I'm truly at my best when I have a plan.
Over the years, I have spent WAY too much time planning. Hours, days even thinking and rethinking. Finally I figured out how to create a good lesson plan in far less time and then have some time for other things.
I fill in the blanks! Yep it's that easy. Here's what I do.
1) use a template - include all the things I want to cover in every lesson, ie. rhythm, listening, singing
2) plug in my material, ie. songs I want to sing, rhythm, composer I want the kids to study
3) choose an music making activity - I love K&D GamePlan,
I don't use all of their material but they have wonderful activities.
You could use music series texts or activities that you learned at a PD - just make sure YOU enjoy it. That energy will translate to your students. And... you might be teaching the lesson a few times so make sure you like it! 😉
4) look forward to having fun in your class without the stress of worrying what to do next. You know what you are going to do, you know what materials you'll want to use, etc.
I put all of my elements (songs, rhythm, etc.) into a Smart Notebook file and the lesson practically runs itself. (FLASH: More about the Smartboard in Music in another blog post.)
Here is an example of my template and how I fill it in.
They say....repetition, repetition, repetition...AND they are right. I choose a song (usually about the time of year or season) and we sing it for the whole month (3-4 times). By the 3rd or 4th time, the kids have heard it enough to sing it. I choose songs from Music K-8 magazine and I show the lyrics on the screen as a powerpoint.
I focus on a couple of rhythm patterns for each grade level and we practice them every class! I have an 8 measure rhythm example that includes several patterns that the grade level is working on. Yes, we say/clap it at each lesson for a month. Remember... repetition.
Then we do a music activity. Maybe we play recorders or boomwhackers or bar instruments or dance or ... something else. This is where I plug in a GamePlan activity.
Finally we do some listening to our monthly Musician in the Spotlight.
My kids LOVE this part of the lesson. I mix up the musicians with a different genre each month, ie. jazz, pop, soul, orchestral (what non-music folks might call "classical"), etc.
At the end of class, we do some rewards and housekeeping and the kids leave.
That's it! Easy-peasy. If you have any questions, please feel free to leave a comment.
Here's to less time doing lesson planning and more time doing what YOU want to do!
Happy honking!
Labels:
organization,
planning
How to Create Recorder Tutors
As I mentioned in my previous post (Recorder Belts...), I started using recorder belts to motivate my students to practice the recorder. It had a bigger impact than I expected. Actually all the kids wanted to do was play recorders - all the time! As much as I love these squeaky instruments, there were other songs/dances/activities that I wanted us to sing/dance/play.
Also after a while, I had a wide span of levels that all these kids could play. Some were just emerging while others were quite accomplished. So...I created Recorder Tutors. During each class, I chose a few students who were afraid to play in front of the whole class or who needed some extra attention and paired them with another few students who had mastered a higher level. Of course, EVERYBODY wanted to do this but I found it worked best with just a few.
So while the rest of the class participated in an entirely different lesson, tutorial tooting was happening.
I set them up in my "office", each pair on a music stand. The white packet of songs had letter names underneath the notes. These were for practice. I didn't let the students earn belts unless they could play the song without letters. If the tutor felt that the student was ready to play for a belt, they removed the white packet and used the yellow packet (no letter names). I even gave these tutors the authority to award belts. Very big deal to them!
This became so popular that tutors and "tutees" came to the Music Room at the start of the day before I had classes to play. I LOVED how much confidence was generated with this strategy! Both the tutor and tutee felt special and progress continued WITHOUT the teacher (my ulterior motive)!!
Side note: I no longer refer to playing on the recorder as tooting since that word now has the connotation of a certain bodily function and creates quite a round of laughter when used. I call it HONKING. So as I tell my kids as they leave me...
Happy Honking!
Also after a while, I had a wide span of levels that all these kids could play. Some were just emerging while others were quite accomplished. So...I created Recorder Tutors. During each class, I chose a few students who were afraid to play in front of the whole class or who needed some extra attention and paired them with another few students who had mastered a higher level. Of course, EVERYBODY wanted to do this but I found it worked best with just a few.
So while the rest of the class participated in an entirely different lesson, tutorial tooting was happening.
This became so popular that tutors and "tutees" came to the Music Room at the start of the day before I had classes to play. I LOVED how much confidence was generated with this strategy! Both the tutor and tutee felt special and progress continued WITHOUT the teacher (my ulterior motive)!!
Side note: I no longer refer to playing on the recorder as tooting since that word now has the connotation of a certain bodily function and creates quite a round of laughter when used. I call it HONKING. So as I tell my kids as they leave me...
Happy Honking!
Labels:
classroom management,
teaching recorders
Subscribe to:
Posts (Atom)