Saturday, August 26, 2017

The Secret to Parent Contact

Connecting with parents is such a powerful part of a teacher's job. Conversations and notes home are so important when establishing a relationship with parents. And when you're the one music teacher (or other special area teacher), you teach a whole lot more than 30 kids. So...how do you make contact with TONS of parents and not have it take TONS of time?

"brag tags" and phone calls

Brag tags are little pieces of paper with brief positive messages on them. You can write the messages or you have the messages pre-printed on the tags.
from Cara's Creative Playground

The easier way is use the pre-printed ones. Buy some fun Astro Brights paper and make copies. You'll get many tags on a sheet so you'll need to cut them down. I recommend finding the school's paper cutter or asking the art teacher if you could use the art room cutter. So much more efficient!

Hand out brag tags at the end of each class. Choose a FEW students who demonstrated behavior or character traits that you want everyone to show. Give them a brag tag. Record their names. A little check after each name on your roster is enough. The object is to give a brag tag to each student over time so you'll want to track this.

You're already thinking about some of your students who struggle to show appropriate behavior. How will they ever get a brag tag? You can give tags for effort, improvement or even stepping out of their comfort zone and trying something new.

Be sure to mention the reason the student is receiving the tag, ie. "Thomas I loved the way you helped Dylan on the recorder", "Ebony, you showed me you were really trying today", "Ayesha, I noticed you are working on your self-control. Keep up the good work!"

So...what do the kids do with these brag tags? Kids are proud to be recognized for doing something well. These tags can be stapled into their agendas, placed in take home folders or even displayed on the fridge at home. I encourage them to tell their parents about WHY they received the tags.


Brag tag templates can be found all over TPT and teacher blogs. In the past, I used Cori Bloom's Notes from your Music Teacher (link here) and Lindy DuPlessis's 35 Character Education Brag Tags (link here) Now I use Cara's Creative Playground's Growth Mindset Positive Notes (link here) .


In my next post, I will write about parent phone calls including a "script" for you to follow.


PSSSST! Next Thursday (and only Thursday), I will be giving you the chance to score my latest Musician in the Spotlight FOR FREE! Stop by my store and look for the newest product and download it for free! HINT: the musician is a MAJOR Country Music Star.

Happy Honking! Ellen

Sunday, August 20, 2017

2 ways to create calm transitions in your classroom

When I first started teaching I was so concerned about music content and materials that I didn't really consider transitions or even protocols for activities. The kids behaved so calmly in the halls with their classroom teachers but once they came into my room, they forgot all about that.

I told myself that was OK because I teach music, right?
And music is a noisy subject, right?

But honestly it felt chaotic to me and it kinda wore me out. I didn't realize that having structure, procedures and protocols for behavior in my classroom didn't make me a control freak. It made me a good teacher.

I needed to take charge. After all this was MY room and I wanted to be comfortable in it. When I'd ask the kids to be "good", that wasn't specific enough. So I decided that my music room needed some FORMAL routines for pretty much EVERYTHING.

I created a step-by-step protocol for entering the room and exiting the room.
Posters of the entrance and exit routines were hung in the front of the room for visual cues.
 

And then we PRACTICED them a few times in each class and not just at the time of the transitions. I made sure that transition looked and sounded like I wanted it to. And if the behavior slipped once in a while, we would review the expectations and do the transition again and get it right.
LINING UP

I also chose CALM activities that came right after entering and right before leaving in order to make the transitions smoother.  For example, you will notice we do "brain hook-up" right after sitting down.

Later on I even added a poster listing the order of the activities in the music class so students could anticipate transitions.

Having the students know the expectations gave them a point of reference. They knew how they were supposed to enter, exit, hand out materials, collect materials, etc. And when they were ready, I assigned leadership roles to students to give them more influence in creating our classroom atmosphere. See my earlier blog on JOBS.

By giving students guidelines to follow, they knew what I wanted them to do and that made a world of difference for me.

Happy Honking! Ellen

Saturday, August 12, 2017

4 Time Saving Hacks for Lesson Planning


I am one of those teachers who has to have a lesson plan. Yes I've had to "wing it" from time to time but I'm truly at my best when I have a plan.

Over the years, I have spent WAY too much time planning. Hours, days even thinking and rethinking. Finally I figured out how to create a good lesson plan in far less time and then have some time for other things.

I fill in the blanks! Yep it's that easy. Here's what I do.

1) use a template - include all the things I want to cover in every lesson, ie. rhythm, listening, singing

2) plug in my material, ie. songs I want to sing, rhythm, composer I want the kids to study

3) choose an music making activity - I love K&D GamePlan,
 I don't use all of their material but they have wonderful activities.
You could use music series texts or activities that you learned at a PD - just make sure YOU enjoy it. That energy will translate to your students. And... you might be teaching the lesson a few times so make sure you like it! 😉

4) look forward to having fun in your class without the stress of worrying what to do next. You know what you are going to do, you know what materials you'll want to use, etc.

I put all of my elements (songs, rhythm, etc.) into a Smart Notebook file and the lesson practically runs itself. (FLASH: More about the Smartboard in Music in another blog post.)

Here is an example of my template and how I fill it in.


They say....repetition, repetition, repetition...AND they are right. I choose a song (usually about the time of year or season) and we sing it for the whole month (3-4 times). By the 3rd or 4th time, the kids have heard it enough to sing it. I choose songs from Music K-8 magazine and I show the lyrics on the screen as a powerpoint.

I focus on a couple of rhythm patterns for each grade level and we practice them every class! I have an 8 measure rhythm example that includes several patterns that the grade level is working on. Yes, we say/clap it at each lesson for a month. Remember... repetition.

Then we do a music activity. Maybe we play recorders or boomwhackers or bar instruments or dance or ... something else. This is where I plug in a GamePlan activity.

Finally we do some listening to our monthly Musician in the Spotlight.

My kids LOVE this part of the lesson. I mix up the musicians with a different genre each month, ie. jazz, pop, soul, orchestral (what non-music folks might call "classical"), etc.

At the end of class, we do some rewards and housekeeping and the kids leave.

That's it! Easy-peasy. If you have any questions, please feel free to leave a comment.

Here's to less time doing lesson planning and more time doing what YOU want to do!

Happy honking!

Sunday, August 6, 2017

How to Create Recorder Tutors

As I mentioned in my previous post (Recorder Belts...), I started using recorder belts to motivate my students to practice the recorder. It had a bigger impact than I expected. Actually all the kids wanted to do was play recorders - all the time! As much as I love these squeaky instruments, there were other songs/dances/activities that I wanted us to sing/dance/play.

Also after a while, I had a wide span of levels that all these kids could play. Some were just emerging while others were quite accomplished. So...I created Recorder Tutors. During each class, I chose a few students who were afraid to play in front of the whole class or who needed some extra attention and paired them with another few students who had mastered a higher level. Of course, EVERYBODY wanted to do this but I found it worked best with just a few.

So while the rest of the class participated in an entirely different lesson, tutorial tooting was happening.
 

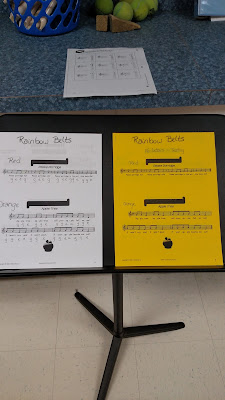
I set them up in my "office", each pair on a music stand. The white packet of songs had letter names underneath the notes. These were for practice. I didn't let the students earn belts unless they could play the song without letters. If the tutor felt that the student was ready to play for a belt, they removed the white packet and used the yellow packet (no letter names). I even gave these tutors the authority to award belts. Very big deal to them!

This became so popular that tutors and "tutees" came to the Music Room at the start of the day before I had classes to play. I LOVED how much confidence was generated with this strategy! Both the tutor and tutee felt special and progress continued WITHOUT the teacher (my ulterior motive)!!

Side note: I no longer refer to playing on the recorder as tooting since that word now has the connotation of a certain bodily function and creates quite a round of  laughter when used. I call it HONKING. So as I tell my kids as they leave me...

Happy Honking!
Related Posts Plugin for WordPress, Blogger...